Monday, July 30, 2012

Crayon Melting Melt-Down.

Everyone on Pinterest is talking about the crayon melting on a canvas. I thought I would try something different and try to melt over a quote on the canvas. My idea was to pick out a really nice quote, and I took my time picking out the size of the canvas and the colors that I wanted to use.


The quote that I found was beautiful; "Clouds come floating into my life, no longer to carry rain or to usher storm, but to add color to my sunset sky," by Rabindranath Tagore. I shortened it up a bit to, "Clouds come floating into my life, no longer to usher storm, but to add color to my sunset sky." I added a few clouds and the color would be the melted crayons. I PAINSTAKINGLY cut out each letter and cloud in some clear masking tape and I STRATEGICALLY laid them on the canvas - mind you every time I moved a letter sometimes they ripped and tore and I had to REDO them. Several times. 

Non the less I kept pushing through, excited for the final product. 


Once completely on the canvas, I got the crayons ready to be melted. This part was fun because I am in loved with all colors. Me and Crayola go WAY back. I used a Exact-o knife to cut the wrappers off the crayons so I could use them for a later project - I have to do something with them I can't just throw them away. That and, I love the names that they pick out for each color. My favorite growing up is Robin's Egg Blue - and I remember my first pack that had it in the 96 count tin cans.

ANYWAYS, I decided to use a hot glue gun to melt them instead of gluing and a hair dryer. Crayon wax is not as hot as regular wax but it still stings non the same. And it is messy and difficult to get through with out the crayons breaking or the crayon moving through on it's own. My fingers and palm were quite sore. 


This project is messy but on my coffee table the dried crayon wax just came right up. I tried to keep everything on a page but it didn't work. I was very irritated at the end of the crayon melting but I did it. When the wax dried I couldn't really see where the tape underneath it was. When I found it, THAT tore and broke the wax and it did NOT come up the way I wanted it to.

I got one cloud off and tried to get the C off but it didn't work. I didn't even take pictures of it I was so disgusted. What I think that I am going to do is use a hair dryer to re-melt the wax and see if I can get the tape up any easier.

Pray for me.


Pin It

Forever Young.


I found a few cute little cut outs from a magazine I had and a clip of an advertisement caught my eye. "Focus on forever young." This seemed very fitting because I have been wound up in the fact that I am getting older and I am still single and I feel like I haven't really gone anywhere in my life. Anyways, I cut out the girl and the flower from some other add and the windows reminded me of New York so I cut them out. I ended up not using them, however.


Since I was at work, I used only my Peerless Watercolors, a quarter, one of my Pigma 0.4mm pens and of course my mini mister and some clear gesso. I didn't really have an idea of what I wanted but it seems that I always drift to blues and greens. I threw in a shade of purple to off-set the blue & green. 


I just wanted a few dots and I colored those in with a yellow orange. I then turned the dots into flowers. I also used the "salt method" for the first time. For those of you who don't know, it's when you sprinkle some salt onto a wet page and let it sit for a bit. The salt soaks up the moister around each flake and it gives it an almost a ripely look.


I glued and pasted and here is my final product:

I like my choices and I might add some doodles or something but for now I love it. 

Also, I redid my Peerless Watercolor pallet since I added all of the original colors.
These are bad pictures but I love this new set up. In time I will go back and put a name beside each color.


Pin It

Monday, July 16, 2012

First Attempt At People.

I have been wanting to be able to draw for a very long time.

I thought that I couldn't draw "correctly" if I didn't have ALL the supplies. Now that I have ALL the supplies, I can't draw because I don't have the right atmosphere. The other day I just had to tell myself to STOP IT. If drawing is something that I want to do, I need to bite the bullet and do it. 


SO, I was browsing blogs and I came across a very simple drawing of a girl smelling a flower. Here is the blog I got this picture from as well as the picture. Living Creatively.

This is the drawing from Living Creatively.

I absolutely loved this drawing. It is so simple yet speaks volumes of what I have been feeling lately. Everything seems to be rushing past me and I panic. I rarely sit down and just relax and take my surroundings in. So, I drew and painted and stamped and taped and this is the final product. The quote is actually from an episode from True Blood. Anyways, here she is - my first attempt!


Happy Journaling!


Pin It

Sunday, July 15, 2012

Canvas Re-Do!

I just didn't like the way the letters came out so I went through with a black Sharpie paint pen (my hero for the day!) and traced over the letters. I think the outcome was much better with the way the letters came out then before. 


Happy Journaling!

Pin It

Screaming All Week


I have been trying to use more magazine clippings in my art journals. I find all these really interesting and beautiful pieces, but I always forget to use them while I am doodling away. Today, I changed all that. 

I started with a pink from my Peerless Watercolors batch. I sprayed the page with my mini mister and spread the color first with a brush and then mostly with my fingers. That is the thing with Peerless is a very little bit goes a REALLY long way. 


I then dribbled some blue to make it drip to the bottom of the page. For the yellow I wet my clear stamping block and put a little yellow on my brush. After the color was saturated on the block I just stamped it on the paper. I didn't really know what I was aiming for, but I loved the outcome. 


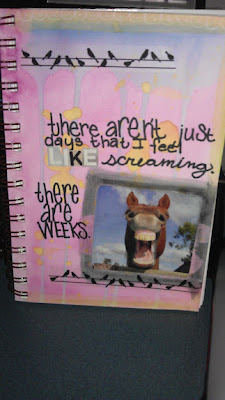
I added my picture, then some black neo color crayon around the outside. I smeared the crayon with my finger and a little water. The black birds on wires is paper tape from Michael's.


This is the finished product - the quote says, "There aren't just days that I feel like screaming, there are weeks. I added some white scallops to the top and didn't really like them so I went over it with a yellow neo-crayon. I added more tape to the top to fill in the space. Also, I didn't like the way my cursive LIKE looked so I cut out some magazine letters. All in all, I love this page.


I was having a hard time deciding a quote to write and the girls in my 21 Secrets group on Facebook told me to write what I was feeling - so I did. It was amazing how exhilarated I felt after I wrote exactly what I was feeling. There was no particular reason for me to be screaming, but I just saw the picture and I knew that is what I wanted to write.


                        Molly was clearly bored with all of my art decisions.


Happy Journaling!
Pin It

Peerless Watercolors Are Amazing!

I found these wonderful Watercolors through Jane Davenport's blog. This amazing artist was able to open my eyes to an all new type of watercolors. You can look up the history of the Peerless Watercolors, and it is truly fascinating.


These colors are sold in little card like paper and on the paper is a concentration of water colors. Jane showed how she cut strips of each color, then arranged them in order according to shade, and used some double sided tape to put together a small pallet of these colors. These colors are so VIBRANT and rich. And the best part is they last forever! I don't understand the science behind it all, but these things are well worth the money.


I did a bit of browsing around on the internet to find the best prices and I found that they were actually cheaper on the Peerless website, even with shipping, then my favorite store Amazon. I found that a store in New York sold them, and it ended up being one about 10-15 blocks from my hotel. So, as soon as I got to the hotel room I hit the ground running.


This store was everything I ever wanted in a store - if there was such thing as a "dream" store this would be it! The Ink Pad is AMAZING. This store had everything - stamps, stickers, stencils, ink pads, books, post cards, wax, paper tape, paper, markers, pens, colored pencils - just on and on. And it was all over the place, no specific order really other then stamps being in one section, stencils in another, etc. Just a plethora of everything. The owner was there when I came and she was such a sweetheart. She was very helpful and I walked out spending over 200 dollars - but that is okay because it is one of the reasons I wanted to go.

 So I, naturally, love all these yummy colors and I cant get enough. WELL worth the money you put into them - no drying out, they last a long time and they are easy to use. Here they are all folded up and in my traveling art case.


Have a great day, you guys!

Pin It

Friday, July 13, 2012

Pinterest Project - Canvas Quotes

Like everyone else in the nation of the internet, I have become addicted to Pinterest. I had a few canvas boards laying around so I grabbed on and some magazines and got to work.

I tore out only the brightest of colors in the pages of my magazines and used the mod podge to glue my scraps. I covered the entire canvas with the scraps. I then drew and cut out the letters to my favorite quote, "I have loves the stars too fondly to be fearful of the night."


I taped the letters to the canvas board. In hind-sight - I will buy stickers instead or find a way to stick the letters I made completely to the board. If they lift up in the slightest paint gets under them. Also, the tape I used messed up some of the magazine papers. If anyone has suggestions, I am an open book! :)

Next I covered the canvas in regular black acrylic paint that I bought from Wal-Mart. Nothing fancy.


I slowly peeled the letters off after the board had completely dried and ta da! Not really perfect for my first go but I have more canvas to decorate! :) I could still go around the edges with a black paint marker and make the letters cleaner but I am afraid I might mess it up!


I challenge you guys to do a canvas of your own and share it with me. The whole process time only takes about an hr. For me, I start one thing and then drift off to something else so this was over a few days.

Have fun! 
-Ashley..

Pin It